Showing posts with label art. Show all posts

5.07.2014

Create Something Beautiful

Today we are creating something beautiful. I have two collages I made featuring the same quote.

"For everything you have missed, you have gained something else." Ralph Waldo Emerson

(Please excuse my crooked pictures. If I could hold a camera or phone still and straight, I'd be a great photographer!)


~ ~ ~ ~ ~ ~ ~ ~ ~ ~ ~ ~ ~ ~ ~ ~ ~ ~ ~ ~ ~ ~ ~ ~ ~ ~ ~

Link up to see some more creative and artistic endeavors today.

Axis of Ineptitude

4.16.2014

April showers

children's umbrella hand print project

Another month from the hand print calendar Phee make for us at Christmas.


2.14.2014

My Sweet Valentine


For Christmas, Phee's class made calendars as gifts for the parents. 
Each month has hand print art and a short poem. 
February's picture is sweet Phee's hands.  My favorite little hands.


I'll post the whole calendar soon!  Lots of really adorable hand print project ideas.  You'll love them!


3.11.2013

Primary Colors

A few months ago, Phee discovered a fantastic Sesame Street clip on YouTube.  It's a catchy little song about primary colors featuring the always entertaining OK, Go.  We sing it all the time.


Not long before we found this song, Phee got a new book, Curious George's First Day of School.  This cute story has George going to school as a helper and mixing up paint colors into a huge mess in the classroom.  There is a color wheel on the back page to explore colors and how they mix together.  It's a simple, fun exploration of the primary colors.

Between this book and the Sesame Street video, Phee quickly picked up on which colors are primary.  She's still getting the hang of mixing them correctly to make other colors.  But, she knows that mixing will yield different results and constantly asks us about combining whatever colors she happens to be using or playing with at the time.

Somewhere in the middle of this color discovery, her class did a color experiment.  This is a simple project you can do at home with paint and paper.  Basically, you need a big piece of thick paper, or finger paint paper, and red, yellow and blue paints.  You squirt a bit of all three colors into separate areas of the paper and let the kids experiment with mixing them together.


We haven't recreated the paint experiment ourselves at home, but we have tried overlaying different colors in crayon and colored pencil to get different results.  Discovering all of these things together has made it fun to learn about the primary colors.  It's not something we set out to learn about at this age, but when you happen upon great tools it's a good idea to use them!  

Have you come across other activities or books that teach primary colors? 


linked up at

11.15.2012

Quick and easy fall crafts

Phee and I have been making all sorts of decorations for fall and Thanksgiving. We've got next Thursday covered! These are all simple projects. And the prep time for each is minimal so you can easily get one of these crafts ready during nap time or after dinner.

Surprisingly, we haven't tackled turkeys yet this year. I'm sure we'll make at least one of those this weekend so that we have something to decorate the dinner table on Friday when we have our Thanksgiving dinner.

And then, it's on to Christmas!

Acorn people #fall #craft ~ Life in Random Bits
 {Acorn People}
You need acorns and tops, googly eyes, a permanent marker, a glue gun and some embellishments. Glue on the eyes, glue the embellishments to the tops or to the acorns, affix hats, draw a mouth and you're good to go!


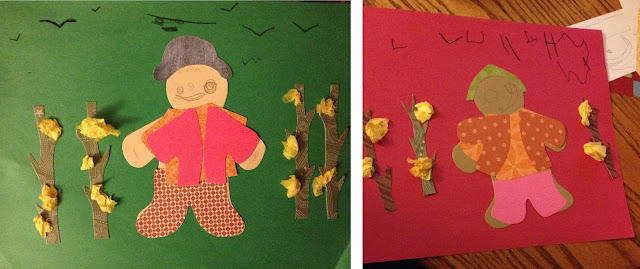
Paper Scarecrows #paper #fall #craft ~ Life in Random Bits
 {Paper Scarecrows}
You need construction paper, gingerbread/body shape, scrapbook paper, yellow tissue paper, glue/adhesive.
We had some die cut gingerbread person shapes already so we started with those. Glue one down to your construction paper background. Use another to trace the scrap paper for pants, shirt, vest, jacket, and hat. Glue various clothes to the scarecrow. Cut out corn stalks and glue on bits of wadded up yellow tissue paper for corn. Add some crows flying around for fun.


Tissue paper tree #paper #craft #fall ~ Life in Random Bits
{Tissue Paper Trees}
You need tissue paper in fall or leaf colors, brown construction paper for trunks, construction paper background, glue.
Cut up the tissue paper into squares, cut out a trunk shape, glue it all down and create some pretty fall leaf scenes.


Magazine leaf trees #fall #craft #leaves ~ Life in Random Bits
{Magazine Leaf Trees}
You need magazine pages covered with fall colors, a large piece of paper, adhesive, and crayons to draw a trunk. 
I cut various leaf shapes out of fall-colored magazine pages. Then we drew a tree trunk and started gluing down the magazine leaves.


9.19.2012

Office decor


9.12.2012

Drawing


9.06.2012

Framed Morning Reminder {diy}

We're into our second week of preschool.  It's going really well, after a rough start.  I didn't help things last week by forgetting Phee's lunch one day.  It was packed and ready to go.  I usually grab it after I've gotten her dressed and gathered my bag and keys.  That particular morning, Phee decided to go wake daddy up.  So, that threw the entire morning routine off.  Halfway to school, while she was whining about having to go to school, I looked at the seat next to me and exclaimed, "Crap!  I forgot your lunch!"  That was not the reassuring thing Phee wanted to hear.


 Our mornings can easily be thrown off track if Phee sleeps extra late, or wakes up extra early.  Daddy being awake in the morning is a rare occurrence that generally is accompanied by ten minutes of just dancing around talking to him while not getting dressed or eating breakfast.

I decided that I needed some sort of reminder so that I would remember to stop and check to see that we have everything we need before walking out the door.  Our front door is in a weird little cutout space at the front of the house and there's a tiny strip of wall just to the side of it.  Perfect for a small frame.


I created this short reminder list in Publisher with WordArt.  It's very simple, but perfect for my needs.  Our list has four items: Phee's lunch, baby (for nap time), water and snack (for the car) and my lunch.  I gave the list a nice border and background and then backed it on some fun scrapbook papers in coordinating colors.  There are always one or two picture frames kicking around the house so I grabbed a smaller one and then my reminder was ready to go.

It's just what I had in mind for a visual reminder.   We haven't forgotten any lunches this week.  And, I have a moment to pause and regroup before we walk out the door. 


linked up at

8.02.2012

Painted Seashells

Last fall when my father-in-law, Phee's Gramp, camp to visit, he brought a box of seashells that Nana had found over the summer. Nana knows that we like our arts and crafts! I forgot about the box of shells for a while and just came across them again this week as Phee and I were looking for a project.

At first, I thought we might just play with them for a bit. The box turned out to contain three large shells that were just begging to be crafted, though. (Thanks to Nana who thoroughly cleaned the shells before sending them!) We're currently working on landscaping our backyard and garden beds.  I thought these might be perfect decorations for a little corner of one of the beds.

Paint large sea shells in bright colors and add them to your garden or flower bed. - www.LifeinRandomBits.com

Better still, Nana would certainly love to put them in her flower garden. So, I got out the acrylic paints and the shells and Phee set to work creating some fantastic artwork to go with Nana's beautiful flowers.

Materials
  • Seashells
  • Acrylic paint
  • Clear sealer

Directions
  • Paint!
  • Once the paint is dry, use the clear sealer to protect your shells.

Phee did a fantastic job with these shells. I just love them. We had some excellent paint colors to work which certainly helped. (I bought those colors for another project so stay tuned!) I'm hoping we can find some more great shells on vacation this week so that we can do this project for our own garden.


Paint large sea shells in bright colors and add them to your garden or flower bed. - www.LifeinRandomBits.com

Paint large sea shells in bright colors and add them to your garden or flower bed. - www.LifeinRandomBits.com

This is a great toddler project. They can paint to their heart's content and the result doesn't really matter. The mess was easily contained with paper on the table and a big paint shirt on Phee. The results are fairly immediate. And, for toddlers who haven't reached the stage where they care about the finished project, this is perfect. They get to create and someone else gets to enjoy the art!


Linked up at

4.12.2012

DIY board books for kids

This post contains Amazon Affiliate links.

Phee loves books. We read handfuls at a time. When we go to the library, we can't leave with less than ten books. It makes me happy. It makes her happy.

She also seems to relate well to books and what they contain. She has a cute little set of books about feelings and they have definitely helped her understand some different emotions. Getting books about potty training helped her understand the concept, throughout the entire process.

DIY Board books for kids

Last year, for Father's Day, I had the idea to make a book about Phee and her dad for him. Well, really for Phee, but for them to read together and for her to have on the weeks when he's working a crappy schedule and she doesn't get to see him for three or four days.

This is a fun, simple project to make a fun book for kids. It could be about anything. I had an idea to make another one for her about going to the doctor's office, but our last two trips we've forgotten to take any pictures so that book never happened. Making a book of family photos is another great idea, especially for family that lives far away.

We also did this with our godsons and let them create their own books. We printed out band logos and record covers on full page labels and then cut them out as stickers. The boys made little band books with markers and the stickers.

DIY Board Books for Kids

DIY Board Books
Supplies
  • blank board book
  • adhesive
  • markers, colored pencils, crayons, etc.
  • printed pictures
Start by deciding what you want to do for a cover and then deciding how you want to layout the book. Once you have that decided, group your pictures by activity/outing/etc. Trim the pictures so that they will fit on the smaller board book pages. I use adhesive to stick them down. Be sure to put the adhesive all around the picture, not just in little sections. Leave room to write on each page, if you choose.

I didn't use anything to cover the pictures on the pages and haven't had any trouble with them curling or coming loose. I use the Tombow Mono Adhesive and it's fantastic. I also put one picture on the cover and even that one has stayed put.

These books can be great little keepsakes of vacations, trips to the zoo, birthdays, etc. or even fun photo books of family who are far away. Use your imagination! 

DIY Board Books for Kids


linked up at 
momnivore's dilemma
The Real Housewives of Riverton
Creative with Kids
The Deliberate Mom 


featured at
 

3.15.2012

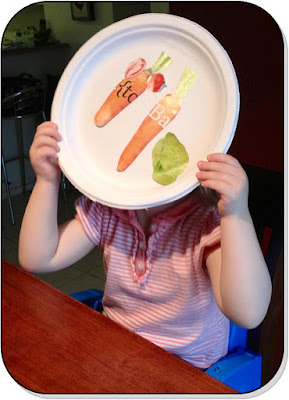
Create a Plate

Sweet Phee has been sick all week. Last night, after dinner, the exhausted kid was asking to paint which neither one of us was actually up to tackling. So, I sorted through my tired mommy brain and came up with a quick project that would satisfy her and fit with her sick-kid attention span.

Create a plate to explore healthy meals, or pair it with a book for a themed feast! - www.lifeinrandombits.com

I'm pretty sure I've seen something like this somewhere in the last few years and it's something I just filed away for later. It's a very flexible, fun project that could fit different criteria for a range of ages. For toddlers, it's just a fun way to explore food and get to play with stickers. Phee loves sticking stickers on paper.

For older kids this could be an exploration of healthy food choices and creating balanced meals. Or, perhaps you have a garden or frequent the farmer's market. In that case, this would be a fun project to talk about what foods are in season at any given time of the year. If your kids have a play kitchen, try laminating the plates for them to play with later. Another fun way to use this project is paired with a book, like The Very Hungry Caterpillar. Cut out, or even print out, pictures of the foods in the story and let kids create their own book-themed feast!

One of the best parts? You probably have all the supplies you need lying around the house right now.

Create a plate to explore healthy meals, or pair it with a book for a themed feast! - www.lifeinrandombits.com

Supplies
  • old magazines (best are those that contain recipes)
  • scissors
  • glue or some sort of adhesive
  • paper plates
  • packing tape
Directions
  • Cut out pictures of food items from the magazines
  • Glue them onto the plate
  • Use the packing tape to laminate the plate

Laminating the plate may be tricky depending on how rounded and raised the edges of your paper plates are. For toddlers, you probably will want to do the gluing yourself and let them do the sticking. Older kids, of course, can do it all.

That's it! A super simple, fun project for many ages. Kids love to cut, paste and flip through magazines and this lets them do it all!

Create a plate to explore healthy meals, or pair it with a book for a themed feast! - www.lifeinrandombits.com


2.15.2012

Sweetheart swans

Hand print swans

Related Posts Plugin for WordPress, Blogger...