Showing posts with label paper. Show all posts

11.07.2014

Thanksgiving Tree

For Thanksgiving this year, we're working on a month-long project focused on things we're thankful for. We created a tree in our dining room and every day we add leaves to it, decorating the tree, brightening the house, and taking a little bit of time to think about the good things that have happened.

This is such a fun project. Phee helped me create the tree trunk and branches. Then, I dug out some pretty scrapbook paper and cut out a bunch of leaves. She is so excited to add her leaf each day and find the perfect spot for it on the tree.

Thanksgiving Tree: a month of things we're thankful for ~ Life in Random Bits #thanksgiving

Taking a minute to think about the good things that happen during the day isn't new for us. Every night I ask Phee about her three good things for the day- good things that happened, that she did, or that she saw someone else do. Our schedule has flip flopped again in the last few months and we've gotten out of the daily habit of three good things, but this beautiful tree is giving us an opportunity to keep that little tradition alive.

I'm looking forward to pulling our regular table out of the dining room on Thanksgiving and making space for our large table when friends join us for dinner. Our tree will add wonderful color and decoration to the day.

What ways do you highlight gratitude and good things in your life? Have you found a way to bring that same awareness to your kids?

Thanksgiving Tree: a month of things we're thankful for ~ Life in Random Bits #thanksgiving

Thanksgiving Tree
Materials
  • construction paper, brown paper bags, brown wrapping or craft paper
  • fall colored construction or scrapbook paper
  • leaf templates
  • scissors
  • tape
  • marker
Directions
  1. Tape construction paper together to form a long column, or cut open a brown paper bag, or unroll a length of brown craft paper.
  2. Draw, or freehand cut, your trunk shape.
  3. Add branches of different sizes.
  4. Arrange and tape everything to a wall.
  5. Trace, or freehand cut some leaf shapes.
  6. Add your leaves to the tree every day and watch the Thanksgiving Tree grow!

Linked up at Busy Being Jennifer, Nancherrow, Just Us Four.

7.29.2014

Kitchen paperwork organization

This post contains Amazon Associate links.

Papers in the kitchen. Papers on the bar. Papers on the table. And I bring home more every day. Mail, info from school, menus stuck in our door. The paper trail never ends!

On top of all the stuff that accumulates, there's the important stuff that we actually need: doctor and medicine info, babysitter info sheet, school handbook. Y'know, the stuff you might need twice a year, but inevitably can't find at the right time.

Use magnetic pockets on the fridge to organize important papers in the kitchen - www.lifeinrandombits.com #kitchen #paper #clutter #organize

I've tried different systems for keeping our bills, receipts, and filing in order. But this extra stuff was always just getting shuffled around. It didn't seem to have a place.

Now, I don't know about you, but I tend to stick important stuff on the fridge. Phee's artwork, sure, but also her weekly menu and monthly school calendar. If you want to order out, you're probably hanging out in the kitchen. Sick kid? We're usually pacing around the kitchen with a sick kid trying to get a hold of the doctor's office. So, all those odds and ends would be most useful close at hand in the kitchen.

These wonderful magnetic pockets have been invaluable. I have two or three folders in each one, with all the papers separated and organized. Take out menus, doctor and medical info, school info, etc. It's perfect! We can grab a folder, get what we need, then put it right back.

Use magnetic pockets on the fridge to organize important papers in the kitchen - www.lifeinrandombits.com #kitchen #paper #clutter #organize

I've seen friends use magnetic whiteboard calendars and these pockets to create a great little family station in the kitchen. One pocket for each family member, one color folder for each person, or something similar. We don't need quite that level of organization with just three of us, but magnetic is certainly the way to go. These pockets are especially strong- the entire back is a large magnet, it's not just two or three strips. I've never once had a problem with the slipping down the side of the fridge or falling off.

They work like a charm and I highly recommend them for keeping your important papers handy.

Where do you keep all the necessary odds and ends so everyone can find them?


~  ~  ~  ~  ~  ~  ~  ~  ~  ~  ~  ~  ~  ~  ~  ~  ~  ~  ~  ~

Come find Life in Random Bits on Facebook and Pinterest for more fun!

6.26.2014

Summery letterhead (free printable)

Ah summer. In Texas. Okay, so I don't like the heat at all, but I love the idea of summer. I like to think of sitting on the breezy beach, reading a book, watching the water. Or chilling on the patio with a drink and friends.

Growing up, we spent so much time outside, especially in the summer. Whole days were spent playing games, reading, exploring outside. My mom and I would swing on the front porch in the evening, or I'd read, write letters, work on little projects on the porch. In high school, my friends would come hang out on our front porch at night, too.

Here in Texas, it gets a little bit too hot for me to be outside so much in the summer. We're out a lot more the rest of the year. But, I still think about doing all those things in the lovely summer weather.

Beachy letterhead for the summer - www.LifeinRandomBits.com

To share that summery feeling, here's a beachy, free printable letterhead. Drop a line to your friends from your summer getaway. Send a note to someone who's feeling a bit down. Share summer memories with your family. Everyone loves mail!

Beachy letterhead for the summer - www.LifeinRandomBits.com

Do you still send postcards or letters from vacation?

Linked up at Coco and Cocoa, Eat Pray Read Love, Nancherrow, Just Us Four, The Recipe Critic.

5.07.2014

Create Something Beautiful

Today we are creating something beautiful. I have two collages I made featuring the same quote.

"For everything you have missed, you have gained something else." Ralph Waldo Emerson

(Please excuse my crooked pictures. If I could hold a camera or phone still and straight, I'd be a great photographer!)


~ ~ ~ ~ ~ ~ ~ ~ ~ ~ ~ ~ ~ ~ ~ ~ ~ ~ ~ ~ ~ ~ ~ ~ ~ ~ ~

Link up to see some more creative and artistic endeavors today.

Axis of Ineptitude

4.14.2014

Toilet paper roll butterfly

We've made many a toilet paper roll butterfly. It's an easy, fun project for kids, and it takes minimal prep which makes it great for a last minute, rainy day project. Or even just for an afternoon when you really need to get something done, but you have a little helper.

toilet paper roll butterfly- kid craft

The little feature I wanted to share with you today is the addition of the antennae on this butterfly. Usually when we make these, I don't even bother with that part. But, Phee made this butterfly at school a couple weeks ago and it's adorable. First, it has googly eyes, and colored googly eyes at that. I love it!

But, the antennae just completes this little guy. If you use a hole punch on the back of the toilet paper roll, you can thread a pipe cleaner through for the antennae. Now your little butterfly is complete and ready to fly around the house!

diy toilet paper roll butterfly with antennae

Have you tried making any cute toilet paper roll animals? I've seen lots of fun ideas on Pinterest, of course,especially owls. We may play around and try to make some more for Easter this year. I'd love to hear which animals have worked best for you.

Looking for some other easy Easter craft ideas this week? Check out the things we made last year!

3.24.2014

Spring Note Cards

Spring has sprung in Texas!  Trees are budding and flowers are popping up all over the place.  It's gorgeous!  Hopefully, those of you buried under many feet of snow will get some of this nice weather soon.  I know you could use the break.

I've been writing little notes to friends and family every couple of weeks this year.  It's one of my goals for the year to stay more in touch with everyone, and not just via text or Facebook.  I love to get mail myself, and I'm sure everyone else enjoys getting something more than junk mail and bills.


I have a printable note card template to help you share the love this spring.  Just print this PDF out on white or cream card stock and cut the little note cards apart.  You don't have to write a novel; these cards are for tucking into a package you're sending or just to let someone know that you're thinking of them.

Happy writing!

Linked up at Julie is Coco and Cocoa, The Recipe Critic, Nessa Makes, Heather's French Press, Bloom Designs, The Grant Life, Nancherrow, Sparkles and a Stove, Just Us Four, Texas Women Bloggers, momnivore's dilemma, Simply Gloria.

3.06.2014

Little Leprechaun (with printable)

Phee has a cute little St. Patrick's Day book, Jack And The Leprechaun, and we've been reading it nearly every day for a week.  In it, a little mouse is visiting his Irish cousins for St. Patrick's Day and he learns about leprechauns.  Phee thinks the leprechaun is hilarious, and we've been pretending that she is a leprechaun running through the house for us to catch.  She holds her wand in one hand like a shillelagh and in the other she has all her gold doubloons in a teeny black pot.  It's a riot.

I put together this printable template so that Phee could make her own little leprechaun.  It turned out to be absolutely adorable.  He's now gracing the inside of our front door and I love seeing him whenever we leave.

We added a body, shillelagh, and pot of gold to complete our picture. Print out the PDF template, cut out the shapes, and then let your kid's imagination run!


Materials
  • template
  • googly eyes
  • adhesive or glue
  • assorted construction paper, card stock, or scrapbook paper
  • any extra embellishments you like

Directions
  1. Print out the template and then cut out the shapes.
  2. Using adhesive or glue, let your kids assemble their leprechaun face on a sheet of card stock or construction paper.
  3. Add whatever embellishments seem like fun!  This could be completing the picture by drawing a body or drawing the leprechaun into a picture.  Or, you could add a body, shillelagh, rainbow, pot of gold, or shamrocks.  Get creative!
  4. Hang up your leprechaun masterpiece to decorate for St. Patrick's Day!
Do you do any sort of leprechaun pranks for your kids on St. Patrick's Day?  I'm thinking about leaving some little green footprints around for Phee to find that morning.  

Check out these Leprechaun Breakfast Cakes!

Contains Amazon affiliate link.

Linked up at The Recipe Critic, We Made That, Heather's French Press, Love, Pasta & a Tool Belt, Sparkles and a Stove, Bloom Designs, Home on Deranged, SITS Girls, Coco and Cocoa, Busy Being Jennifer, Nancherrow, Just Us Four, P is for Preschooler, Nessa Makes, A Time for Seasons, Texas Women Bloggers, momnivore's dilemma.

2.10.2014

Heart Door Hangers

After making our heart banner last week for the fireplace, Phee was on a roll and excited for more decorating.  I asked her what she had in mind.  As she scanned the living room, she decided that maybe she would like to hang something on the doors.  Works for me- I love to decorate!

Along with some paper I'd picked up at Target in the dollar spot, I had gotten a little pack of ribbon.  I didn't really look at the ribbon, and it turns out, those rolls only have a very small amount of ribbon.  But, that amount was perfect for door hangers!

I'd been wanting to make something similar to these since Halloween and just never had time to do it.  So, this turned out to be fun for me, and fun for Phee as well.


Materials
  • patterned and colored paper
  • ribbon
  • adhesive
  • stickers and embellishments

Directions
  1. Cut your ribbon to your preferred length.  Ours hang down about 10 inches.
  2. Tie a loop in the ribbon so that you can hang them over doorknobs.
  3. Cut out small, medium, and large hearts to fit on your length of ribbon.  If you want the hearts to match up evenly when you adhere them to the ribbon, be sure to keep an eye on your paper when you cut them.  Some of our paper was only patterned on one side, but I forgot to put the white sides of the paper together, with the color/pattern facing out, when I cut the hearts.
  4. Lay out one side of a set of hearts, from smallest to largest (top to bottom).
  5. Spread adhesive or glue on these hearts and then lay the ribbon over the center.
  6. Place the other side of each heart over the ribbon to sandwich it between the layers.
  7. Continue with all hearts and ribbons.
  8. After the hangers are assembled, you can decorate them with stickers, stamps, markers, glitter or whatever else you may want to use.
  9. Hang the ribbons up on your doorknobs and enjoy your lovely decorations!

Another cute and simple Valentine decoration for your house!  The best part is that if one gets stuck in a door, you can always throw another one together.  And, when the holiday is over, you can hold on to them for another year, or just toss them.

These would also make a cute decoration to give a friend as a Valentine, or to use as a simple classroom decoration.  What's your favorite Valentine's Day decoration?


Looking for candy-free Valentine ideas?  We made oatmeal valentines last year!  And check out some other crafts and treats we've made for Valentine's Day.

Linked up at Life of the Party, momnivore's dilemma: Sunday Best, Just Us Four, SITS Girls, Recipe Critic, Heather's French Press, We Made That, The Wednesday Roundup, Bloom Designs, Nancherrow, P is for Preschooler, momnivore's dilemma, Simply Gloria.


2.03.2014

Valentine Heart Banner

Christmas was barely over before Phee was talking about Valentine's Day.  I don't think we even had our decorations down before she was ready to put hearts up all over the house.  I managed to hold her off for a few weeks, but this past weekend she was ready to deck the house out in pink, purple, and red.

Our first project for the holiday was a simple heart banner to decorate our fireplace.  A couple weeks ago I grabbed a pack of Valentine's Day themed scrapbook paper and some conversation heart stickers at Target in the Dollar Spot.  We used those, some ribbon I had on hand, plus a bunch of Valentine stickers leftover from last year.

DIY decorative Valentine heart banner ~ Life in Random Bits #valentine #diy

Materials
  • solid colored paper or cardstock
  • Valentine themed paper
  • Valentine stickers
  • crayons/markers/pencils
  • ribbon (the length depends on where you plan to hang your banner)
  • adhesive
  • stapler

Directions
  1. Cut hearts out of the solid colored paper.  Mine were all about the same size, but they certainly don't have to be.  Get creative!
  2. Cut smaller hearts out of patterned paper, if desired.
  3. Decorate the solid hearts with stickers, smaller hearts, crayons, or whatever else you have in your craft stash.
  4. Staple the hearts to the banner.  Try to get them somewhat evenly spaced; it makes it easier to balance out and hang.  
  5. Hang your banner up!
We had so much fun decorating this banner together.  It looks bright and festive over our fireplace and Phee's very proud of it.

Do you decorate for Valentine's Day?  Do you make the decorations or do you have some old favorites stashed away that you dig out every year?

DIY decorative Valentine heart banner ~ Life in Random Bits #valentine #diy


Looking for candy-free Valentine ideas?  We made oatmeal valentines last year!

Linked up at The Recipe Critic, The SITS Girls, Pieces by Polly, Creations by Kara, 5 Minutes for Mom, Controlling Craziness, We Made That, Heather's French Press.

10.04.2013

Paper Pumpkin Patch

Last year for Halloween we decorated the house with some cute paper jack-o-lanterns that Phee put together.  This year, we decorated early with all the regular decorations and then Phee wanted to add some more.

We made tissue paper ghosts and hung them around the house.  But we needed some pumpkins, too.  And so a pumpkin patch was born in the hallway.


This is a really fun, simple project for kids of all ages.  One night, I did the vine part of the patch while Phee colored the leaves.  The next night we all got crafty after dinner and each made our own jack-o-lantern for the pumpkin patch.

Phee asked her dad to make a mean face.  I did the classic smiling jack-o-lantern.  Phee used a bunch of colors and to make a cute little pumpkin with lots of extra details.  She used light colors, too, which makes her design really hard to see in the picture, but it's definitely cool.

Materials
  • green, brown, and orange construction paper
  • crayons or makers
  • scissors
  • painters tape

Directions
  1. Draw some leaf shapes on green construction paper for the kiddos to color and decorate.  Feel free to add embellishments here, too!
  2. Cut out some green construction paper vines or grass for the base of the pumpkin patch and tape them up on your wall.
  3. Cut out pumpkin shapes from orange construction paper for the kiddos to decorate.  You can get really creative here... paint, glitter, stickers, crayons.  It just depends on how long you want the project to last and how involved you want to get.
  4. Add brown paper stems to the pumpkins.
  5. Put your pumpkins in your new pumpkin patch!


3.28.2013

Quick & Easy Easter Projects

Looking for some fun, easy projects that you can do with the kids?  I've got you covered!

It's been whirlwind busy at our house lately.  Phee and I haven't had time to do any fun projects in a few weeks and I think we were both wondering if we'd ever have time again.  So, I came up with a couple of quick and easy projects for Easter.  Each has minimal prep time and doesn't take too long to complete either.  Perfect for my hectic schedule and Phee's often short attention span.


First, the good old cotton ball sheep project.  I'm sure we've all done this before, either as a child ourselves, or with kids.  It's so cute, though, it's hard to pass it up!  Cut a sheep shape out of card stock or thin cardboard (cereal box or packaging), gather some cotton balls, glue and googly eyes.  All you have to do is pour some glue out for your kids to dip the cotton balls into and then let them go to town plopping them down all over the sheep form.  Add the googly eye last and let it dry before you hang it up or play with it.


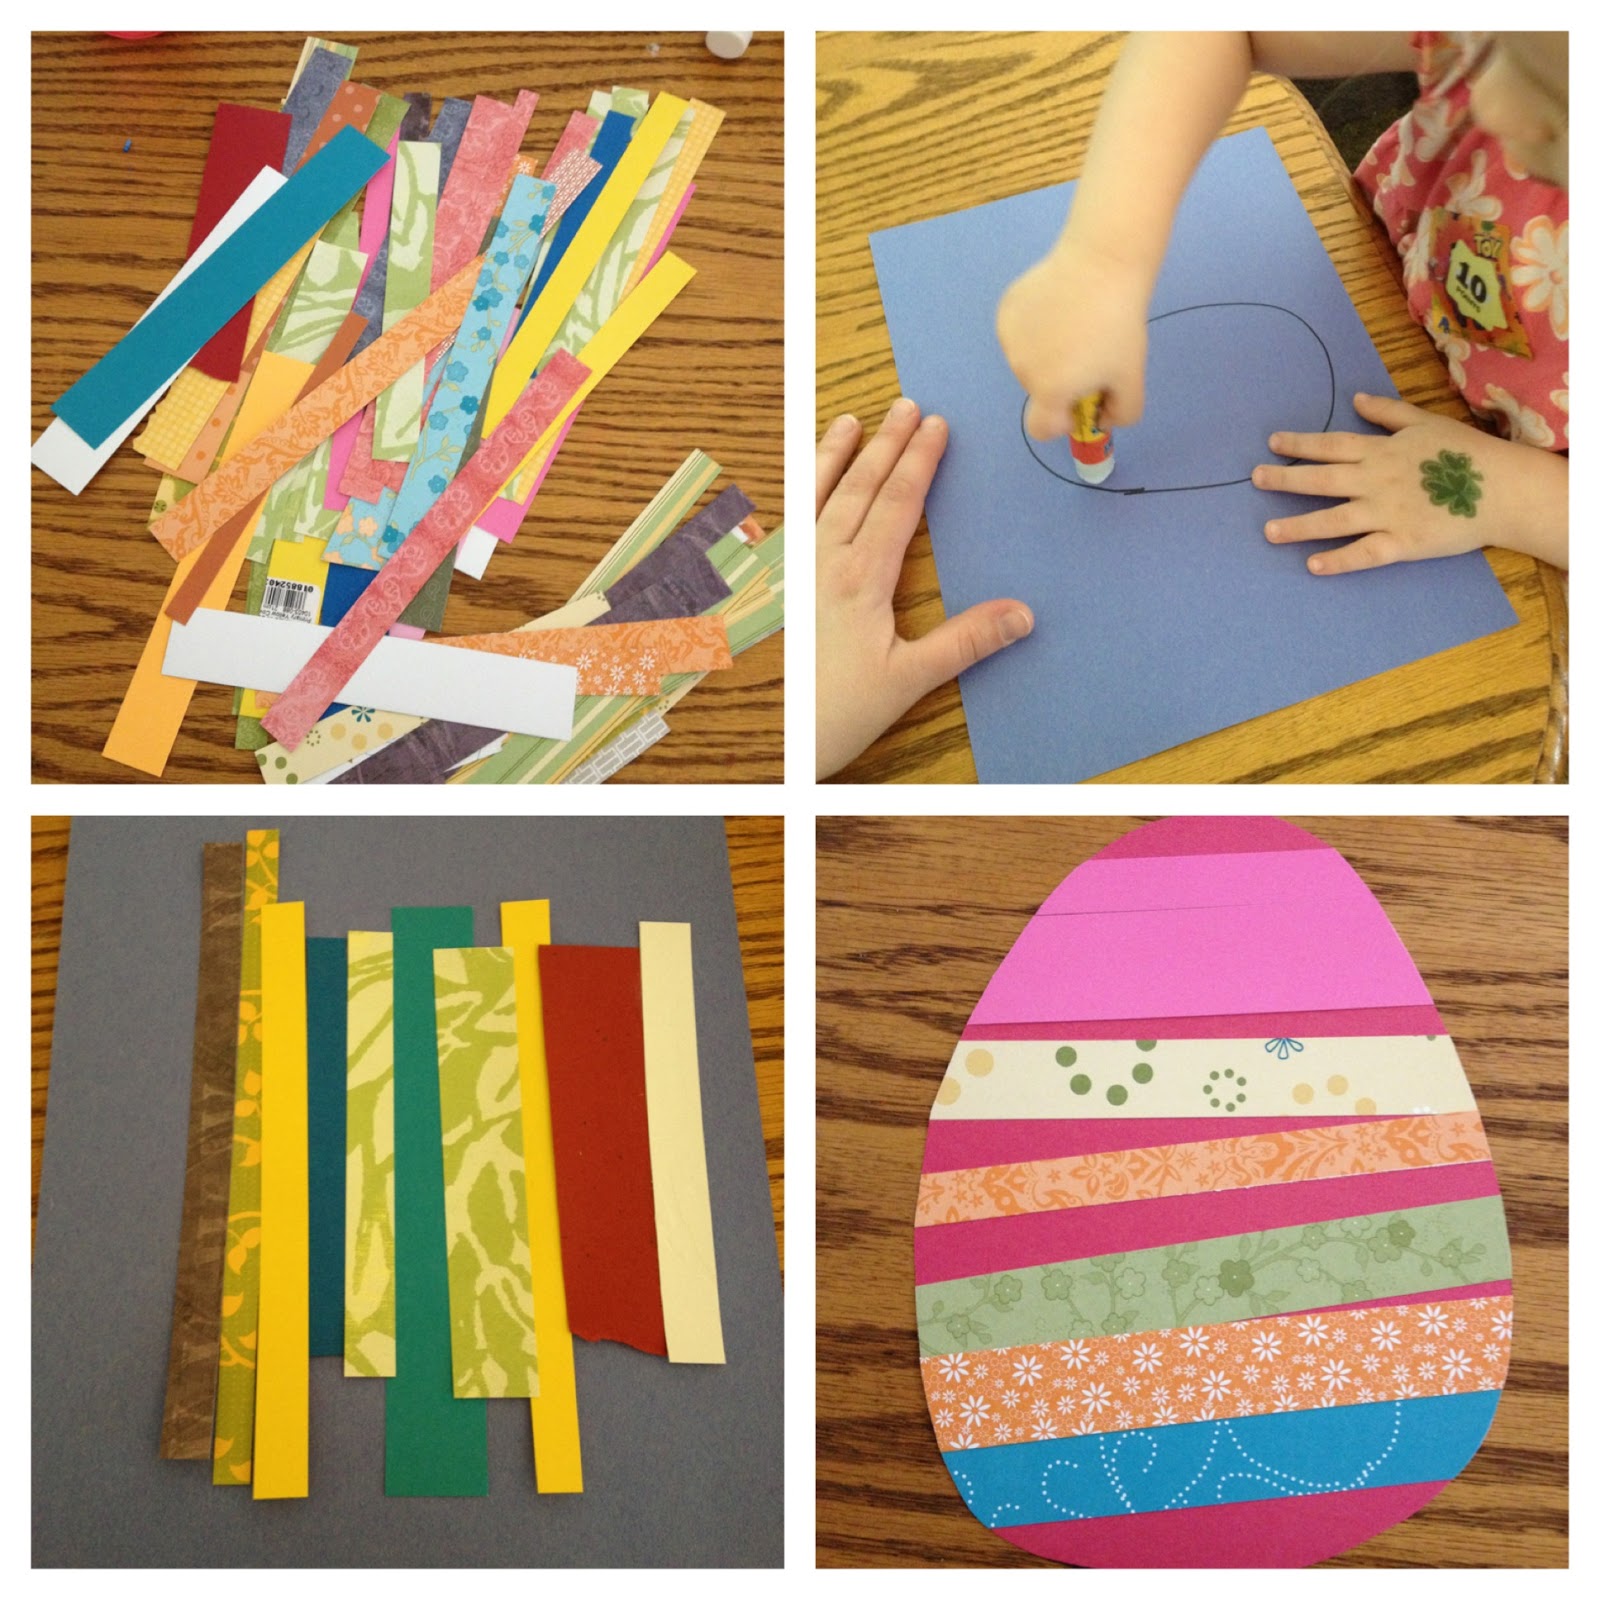
Moving on to Easter eggs!  Cut up strips of scrapbook paper (plain construction paper, glossy magazine pages or even the comics would work, too).  Draw egg shapes on both sides of pieces of construction paper (holding the sheet up to a window helps so you can line the outlines up).  Grab your glue again and put a layer of glue all over the egg on one side of the paper.  Let your little one lay strips of paper across the egg.  Once it dries, cut out the egg shape on the back and flip it over to see your fantastic striped Easter egg!


Next, a mosaic chick.  I printed out a black and white coloring page of a chick in an eggshell.  Then, I cut up a few strips of construction paper into some random shapes and sizes.  Cut a triangle beak out of orange paper, grab your googly eyes and glue and you're ready to tackle this fun mosaic.  Start by spreading glue on the chick and let your kid use yellow bits of paper to cover it.  Then, move to the shells and the other paper colors you've cut up.  When the mosaic is finished, add the beak and googly eyes and you've got an adorable little baby chick!


And finally, a tasty treat for everyone.  We used to make these cupcakes with my mom every year.  You need a cake mix, frosting, green food coloring, shredded coconut, jelly beans and pipe cleaners.  Bake the cupcakes as usual.  Color the frosting and coconut green.  Spread the frosting on the cupcakes, add some coconut and then put three or four jellybeans on top as Easter eggs.  Then, cut your pipe cleaners in half and attach one half to each cupcake to be the Easter basket handle.  Super easy and adorable Easter dessert!

Whew!  There you go- a few easy projects you can still do before Easter if your house needs a little decorating!  And a yummy treat that you can share with your friends for Easter dessert.  Enjoy!

Ooh, a bonus project!  I picked this up in my daughter's parent pocket at school this morning.  The basket is made out of a file folder.  The spine of the folder is the bottom of the basket.  After the kids decorate the card stock eggs, they're tucked inside the basket and the two halves of the folder are glued together.  Such a genius idea!  I love the projects Phee's teachers come up with.


What sort of decorating do you do for Easter?  Do you have some fun family traditions, like our cupcakes, that you've introduced to your kids?

1.31.2013

Cardboard Garden

Sweet Phee is really into her primary colors right now. I'll have another post about that soon. On Sunday, after watching a recent favorite episode of Curious George, she asked if she could plant primary color carrots. She asked right at 5:00 as I was getting ready to make dinner, while simultaneously trying to watch my first full game of the hockey season. Ah, kids...

Phee was not happy when I said we didn't have any seeds to plant. I quickly came up with a very cool idea, though, which she has been enjoying all week. We still have some random leftover boxes from Christmas kicking around the garage. I grabbed a small, square box that didn't have a bunch of printing on it. I used construction paper in primary colors and some cereal boxes from the recycling bin to make carrots. (Please excuse the yellow pictures from a darkish room.)

Create an indoor cardboard garden - www.lifeinrandombits.com

Voila! Phee has her own 3 carrot garden to play with. She can plant the carrots, pick the carrots and make up endless stories and songs about her tiny garden. It's been a hit all week!

This is a great project for planting season. You could make a separate "plot" for different kinds of veggies. Or, use a couple big boxes (paper boxes would be sturdy enough for toddler play) and add different veggies as you plant them, or as they start to grow, or when you start to harvest them. It's a great way for kids to continue to learn about the food that you're growing while they're playing with their friends and stuffed animals.

Materials
  • construction paper
  • thin cardboard, like cereal boxes
  • adhesive
  • cardboard box
  • scissors

Directions
  1. Set up your cardboard box. I taped one end of ours closed, but left the other open so that we could easily retrieve any veggie that got stuffed all the way into the box.
  2. Decide how many veggies will fit on one side of your box and then cut slits in the box for the veggies to fit into.
  3. Cut out your veggies of choice. You can print out clip art and cut it, or just draw them freehand.
  4. Feel free to embellish the veggies with crayons or markers to add some detail.
  5. Back the cut out veggies on thin cardboard. I used cereal and cracker boxes that were in the recycling bin.
  6. Plant those veggies in the box and have fun pretend gardening! 

{our garden plot box ready with slits}

{our primary color carrots}

Create an indoor cardboard garden - www.lifeinrandombits.com
{we left one side open so we could retrieve lost veggies}


Do your kids like to help out in the real garden when it's time to plant or harvest? Do they have a favorite garden book?


linked up at

12.20.2012

Letter from Santa {diy}

One year when I was a child, my brother and I got amazing letters from Santa.  If I remember correctly, they were on parchment paper with fancy script- very cool coming from Santa. 

Wouldn't your little one love to get a letter like that?  I know Phee would!  She's so into Christmas this year.  We've been watching Christmas shows and specials for the last few weeks and she can sing all the songs.  She's decorated a real tree, a paper tree, she has her own tree, she's done a gingerbread house... she loves it all.

At school she wrote a letter to Santa with help from the teacher.  It's an adorable little letter and when she names the things she would like for Christmas, it's apparent that she just looked around the room and named the things she could see.  The letter references shows and characters she's never seen outside of school before and it just cracked us up.

I snagged the letter and have been carrying it around for a couple weeks so we could mail it to Santa.  But, sweet Phee then got pneumonia and I never quite got around to addressing the letter or having her mail it.  I still think it would be fun for her to get a letter from Santa, though.

I created a letter using Publisher and printed it out for her.  Tonight, we're going to go down to the mailbox and mail her letter to Santa.  And then, one of these days before Christmas, she's going to receive the special letter from Santa.  I think she'll be thrilled!

I created a few blank letter background images for you to use, too.  Just click on an image and save it to your computer.  I don't have parchment paper, or even fancy paper, but I don't know that that really matters.  The backgrounds have a vintage feel to them with some cute vintage clip art images.  Santa's signature is on each one, but there's plenty of room to hand write a note from Santa, or to use the image as a background and type the letter over the image in a text box.

Enjoy creating this special note for your child and watching their face light up with this magic of the season.  Merry Christmas!


Santa with tree image and Santa with sled image are from Microsoft's clip art gallery.
Santa with his reindeer is a free vintage image from Vintage Fangirl.


11.21.2012

Last minute crafts

If you're home with your kiddos today and need to keep them entertained, here are a few fun crafts and projects.  They're all easy and come together fairly quickly.  Plus, wouldn't it be fun to eat your Thanksgiving dinner off of a homemade, one of a kind piece of artwork?


 Thanksgiving place mats


Fall trees


A tree for the wall that can be adapted to lots of season and holidays


11.15.2012

Quick and easy fall crafts

Phee and I have been making all sorts of decorations for fall and Thanksgiving. We've got next Thursday covered! These are all simple projects. And the prep time for each is minimal so you can easily get one of these crafts ready during nap time or after dinner.

Surprisingly, we haven't tackled turkeys yet this year. I'm sure we'll make at least one of those this weekend so that we have something to decorate the dinner table on Friday when we have our Thanksgiving dinner.

And then, it's on to Christmas!

Acorn people #fall #craft ~ Life in Random Bits
 {Acorn People}
You need acorns and tops, googly eyes, a permanent marker, a glue gun and some embellishments. Glue on the eyes, glue the embellishments to the tops or to the acorns, affix hats, draw a mouth and you're good to go!


Paper Scarecrows #paper #fall #craft ~ Life in Random Bits
 {Paper Scarecrows}
You need construction paper, gingerbread/body shape, scrapbook paper, yellow tissue paper, glue/adhesive.
We had some die cut gingerbread person shapes already so we started with those. Glue one down to your construction paper background. Use another to trace the scrap paper for pants, shirt, vest, jacket, and hat. Glue various clothes to the scarecrow. Cut out corn stalks and glue on bits of wadded up yellow tissue paper for corn. Add some crows flying around for fun.


Tissue paper tree #paper #craft #fall ~ Life in Random Bits
{Tissue Paper Trees}
You need tissue paper in fall or leaf colors, brown construction paper for trunks, construction paper background, glue.
Cut up the tissue paper into squares, cut out a trunk shape, glue it all down and create some pretty fall leaf scenes.


Magazine leaf trees #fall #craft #leaves ~ Life in Random Bits
{Magazine Leaf Trees}
You need magazine pages covered with fall colors, a large piece of paper, adhesive, and crayons to draw a trunk. 
I cut various leaf shapes out of fall-colored magazine pages. Then we drew a tree trunk and started gluing down the magazine leaves.


10.18.2012

Paper chains and tiny ghosts

Phee is thoroughly enjoying Halloween this year. We have a couple Halloween-themed books we've been reading, plus the always popular It's the Great Pumpkin, Charlie Brown! Phee is a big fan of Snoopy. In fact, after many, many costume ideas (Pinkalicious, dog, fairy princess, clown, lion, green dog) we've arrived at Snoopy as her costume this year.

Phee and I have completed a few projects to decorate the house this year, too. First, we did paper jack-o-lanterns. Very popular. We made some puppets and a puppet theater and we've been having fun with those (writeup coming as soon as I get some decent photos!). Last weekend, we did one of Phee's favorite projects- paper chains. We did this for Christmas last year to decorate her room and decided to do it again for Halloween.

{this is what I get when I ask for a smile}
I cut orange, black and white paper into strips. Phee gets to color them and hand them to me and I tape them together in loops to create the chain. Sometimes we add holiday-themed stickers, too, but we didn't have any this time. When we're finished, she picks the place to hang the chain.


I drew a page of ghosts for Phee to color, too. My original plan was to hang them off of the paper chain once it was up. Phee preferred to stick them on her wall in a neat little row after I cut them out. Cute either way!
{love that the ghosts look like they have goatees and glasses}


Do your kids get to decorate their rooms, or do the decorations stick to the main rooms of the house? What's your favorite Halloween decoration?

~  ~  ~  ~  ~  ~  ~  ~  ~  ~  ~  ~  ~  ~  ~  ~  ~  ~  ~  ~  ~  ~  ~  ~

Find more Halloween fun here!


10.04.2012

Paper Jack-o-Lanterns

Phee and I have been a little lazy in the arts and crafts department lately. She's been so tired with the adjustment to the new preschool.  Her little head is so full of info. We've had family in town and with our crazy schedules, too, we just haven't had the time or energy to do projects lately.

But with Halloween approaching, I decided it was time to make some decorations and get back into the swing of things. I created this simple jack-o-lantern project for us to do last night. Phee loved it! She loved it so much, she said goodnight to the pumpkins on her way to bed last night.

Paper jack-o-lanterns ~ Life in Random Bits #halloween #pumpkin #crafts
{my favorite of Phee's three pumpkins}

I used a large clip art pumpkin and then created different eyes, noses and mouths for Phee to use to make her own jack-o-lantern faces. She couldn't hardly wait for me to get the pieces cut out. She played with them, making silly faces, while I got everything ready to go.

I made piles of each facial feature. One at a time, she chose a set of eyes for each face, then a nose and a mouth. That was the only direction I gave her. She did all the placement on the pumpkin herself.

The jack-o-lanterns came out really cute. The features are all basic and nice. There aren't any scary faces here. This is a great way to "carve" pumpkins with a toddler and let them create their own masterpiece with out any of the sharp tools or gooey pumpkin guts. Plus, they're super cute decorations for the house.

Download the PDF.

Here's another fun paper pumpkin craft we used to decorate!

Paper jack-o-lanterns ~ Life in Random Bits #halloween #pumpkin #crafts
{Phee wanted her pumpkins all together instead of spread around the house}

What sort of decorations do your little ones like to put up around the house for Halloween?


Related Posts Plugin for WordPress, Blogger...